So far we have covered how people find your business and we have discussed how to convert people that contact you into paying clients… now I would like to discuss how to measure success and determine ROI.
To recap we found out that social media, if you are doing all the various traditional and online marketing, generates a small fraction of your business… but, if you are like me, Social Media is the majority of your marketing initiatives; thus generating the majority of your leads.
We also discussed that people that you are attracting to your business through social media are better informed than other clients, thus making you work harder to make them paying clients…
So now, for argument sake, you have sold them. The money is in the bank and you’re on to the next potential sale… not so fast… shouldn’t you truly understand how that client came to you, what it cost you to get that client; then determine if it was cost prohibitive to even make the sale?
If you are investing too much time, spending way too much money, and it is resulting in minimal sales is it really worth it? After all, the definition of insanity is, “doing the same thing over and over again and expecting a different result”.
The purpose of this BLOG entry is to just make you think. I am not going to be the guy that says you should not sell something, or you should sell something. I just want to give you options and create opportunities to help your business grow. Heck, in one of the examples you will see below about my “Twitter” efforts is an example of an ROI loss that I am willing to take because of the increased exposure I get.
I want to take a look at something I was just exposed too; it’s called the “Social Media Money Formula”. The formula looks like this:
(R – Cg) * (F * Cr * Or * Pr) – (h * T) = Profit
R = Revenue per sale
Cg = Cost of goods sold
F = Number of friends/followers (SM reach)
Cr = click rate on SM links (% of followers that click)
Or = Opt-in rate) % of clicks that opt-in)
Pr = Purchase rate (% of opt-ins that buy)
H = Hourly rate for your SM efforts
T = Amount of time you spend on social media
The translation is (Revenue minus cost of goods) * (Number of friends times click through rate times opt in rate times purchase rate) less (your hourly rate that your time is worth times your total time spent on social media) equals your net profit. Or for you business types, “Earnings before Depreciation, Taxes and Amortization”, “EBIDTA”
Let’s look at a real world scenario for me. I have 431 followers on Twitter and have tracked all the sales I generated because of Twitter in the month of December. FYI, I always ask how people found me so I can track ROI back to my individual efforts.
I am going to determine the ROI for a sale of a few images to a client that found me on Twitter during December… This was the only revenue that I generated through my Twitter initiatives during December, so it will be simple to show you as an example.
($250 in revenue less $40 in cost of goods, travel and editing time) x (431 followers on Twitter X 50% estimated click rate X 4% opt-in rate to enquire about images X 10% conversion rate of people opted in to who bought) – ($50/hr for my billable hours X 4 hours of my time per month working on Twitter)
Net profit after hard costs ($210.00) x Conversion of my Twitter followers (0.862) – my time doing social marketing ($200.00) = -$18.98 Profit for the sales of a few images from my efforts on Twitter. So I lost money on in my efforts on Twitter but I expanded my network, had a few people sign up for a newsletter and did a decent job creating brand awareness.
My true bottom line showed a net loss when I did the ROI equation, but overall I actually put money in the bank and more people found out about my “Brand”… aka, Me. It may have not been a smart move, and maybe I should have walked away like i said in the post after this one... but I made the conscious decision to sell them for less than I normally would have.
If I want to increase the ROI I know I have to do a few more things to increase my brand awareness and create better conversion… and you may want to try these as well.
For those that blog tips and tutorials, create more compelling information and schedule the releases at the same time each week. These BLOGs for instance are always released at Friday at 5:30pm. People are starting to know that about my blog and will come on the weekend to read what I posted.
At the end of each blog entry put in a web form or contact form to let the reader get more information and get on your mailing list. This further bolsters your follower base and increases your chance of conversion for whatever it is that you sell.
For those that just post out photos that you have taken… make sure you have links to blog tutorials that you may have written on how to take that type of image, post a link to your price list or post a link to other photos you have taken. Offering alternative options for the web browser to look at keeps them on your website and will increase your chances at converting them as clients.
Whatever you post online on your website the formula is quite simple…
1)Create compelling and interesting content
2)The content must lead them to an opt-in form so they can see more valuable content
3)Share all your content via social sites
4)Capture the leads
5)Follow up immediately when they enquire
6)Sell them…
7)Ask for referrals to obtain more prospects
If you would like more information or would like to receive my newsletter please contact me through my website here.
Have a great New Year’s celebration with your friends and family,
Kev

Friday 30 December 2011
How to Set Your Pricing and Generate Profits - The question on many photographer's minds
Pricing your photos is one of the greatest hurdles for photographers looking to turn their passion into a business. We are often insecure at this point in our personal photographic growth and may not believe we are as good as others believe... so how could we ever believe people would pay good money for our images?
It can be especially nerve wracking when a client asks you why they have to pay so much for your photos and services. Especially if you have not done your homework and you just stole some pricing from some other local photographer’s website as a quick fix.
You HAVE to understand that you are now a small business owner, you have to separate personal feelings and let go of the personal connection with your images, then charge a fee where you are generating a profit margin. You need to calculate and understand what you are charging; and be confident that you are worth what you are charging.
You see, you need to not only know the worth of the services you are providing, but you need to know how to articulate what you’re worth and why you’re worth it. Make sure you’re equally versed in the business practices as you are in your photography skills. If your images are of a certain quality and you have the confidence to negotiate the value proposition of your company with confidence, you give your client confidence as well.
The following should provoke some thought and give you some ideas on how to better price your images and services and generate a profit.
Know What You are Worth
Before we go any farther... you have to know and believe what you are worth.
Scenario #1... This is your full time job
The first step is to do your research and find out what the competition is charging for what they are offering. This will give you some confidence at coming up with your own prices. But do not just cut and paste their pricing. People do not only buy on price alone... they buy relationships and value.
The first step you could do to determine what you are worth is by calculating your Cost of Doing Business (CODB). Your CODB is what it takes at the end of every month for you pay your bills. Be realistic here, you’re likely not going to be bringing in a lot of money during your first few years of business.
You could reach your CODB by a few simple calculations. Take all the expenses you need to run a business for the month – website hosting fees, insurance, rent, insurance, food, travel etc., add a salary, and then divide that figure by the number of jobs or images you think you’ll book or sell during any given month. Keeping in mind that you may have to lower your salary or overhead in order to achieve new business.
Scenario #2... You have a full time job and you are also in the development phase of building a photography business
I have a full time job that I love doing at this point. But I am also a nature photographer by heart and sell my images and run workshops for people of all levels looking to be better photographers or need help growing their business.
When I first started out I would determine that an image will be for sale, I took into account what it cost me to take a specific image. For example, I drove 50 miles, slept over at a hotel, had breakfast and dinner and came home with a couple hundred images. It took me one hour of editing time, and the result, I have one image I deem good enough to sell. So my hard costs were:
$25 in gas,
$15 in food
$75 in hotel accommodation,
$40 for my one hour of editing time
Total hard costs to produce image was $155.
I then determined that i will sell this image no less than 10x. That leaves a hard cost of $15.50 per image sold before I print. I then add a cost to print which could be $75 for a canvas print. That leaves $90.50 as my hard cost to produce the finished print. On top of that I always ad $50 for my profit and that leaves the price of that particular image at $140.50. A few different variables may come into play with lowering my hard costs, things like, I did not stay overnight, I came away with two images that I could sell... you get the point.
Now that I have been doing this for a few years and I can now average my prices by size and know I am generating enough profit for every image I sell. I also use a formula that determines ROI from my marketing efforts and you can read that in my blog posting about converting clients using social media.
For my workshops I simply charge what I believe my time is worth. I offer three different types of workshops. The first a quick one hour camera tutorial for people that just received their camera as a gift and want to know what the camera does.
The second is a four hour workshop where i give a price break on my time for multiple hours, but maintain a decent profit margin based on my experience and tenure.
The third type of workshop is a mentor program. I know how many hours it takes to be a mentor and I price it out based on hours spent with each client.
For any workshop I can justify the expense by the added value that I offer and the quality of my own work. As I do more workshops and my images elevate to another level, I will increase my price and be able to justify it easily.
How to Articulate Your Worth
Now that I gave you some sort of idea on how to charge for your images and services. The next thing you have to be able to do is to be able to articulate why you charge what you charge. A good way to do this is to create marketing materials that can be described as a “sales pitch”. It is simply a page of the features and benefits of doing business with you. This is the “why are you worth it” document.
A good example of this is the following... I have been to Paris six times in my life. I have stayed in 4 different districts and know people that live in the city. I know what time of year is good to visit certain attractions and how to get deals in order to get into a maximum amount of venues for anyone attending a photography workshop in Paris. I also know where to stand to get better images and what times of the day work best for specific attractions.
Is that not more appealing to a potential client than simply going on a Parisian photography workshop with another photographer that does not know the city like I do? I offer a lot of extra value by coming with me.
Another good way to get the price you want from a client and subsequent referrals is to under promise, over deliver. I’m not telling you to down play what you bring to the table and definately not exaggerate what you can do for a client. Negativity can spread like wild fire. Just go the extra mile to really deliver on your promises – you’ll not only create a happy client, but the referrals will already come to you sold on your services.
Here is a real world example of mastering this art form. I sold two images to a gentleman and he paid me the price that I was asking. I also had a third image from the same series of images he wanted. Understanding that the images were for his father for X-Mas, I sent him a third image in digital format as added value. He had to print the third image, but he got more bang for his dollar by buying the images from me than he would have if he bought from anyone else.
Listen to Your Clients and Watch For Buying Signals
OK, so now you know your worth, you’re prepared to articulate it with confidence, and now it’s time to discuss the importance of listening to what clients are telling you. This is important step in being able to adapt your photos and services to your clients’ needs.
Every client may be different, so you need to be able to adjust your offerings. Especially today in a very competitive market. Your clients know more today than they ever had, and even some may be amateur photographers that have their own opinions.
You also need to understand buying signals... watch for the body language and not so much their words. People are conditioned not to say “no” when you are sitting down with them. People generally hate confrontation. You may walk away from a client meeting and think you sold them, when really, they just didn’t say “no” to your face and save it for a phone call of email when you follow up.
You have to learn to recognize the hidden signals and not just the verbal ones. If you’ve got a client leaning forward, engaged in what you are showing them and nodding a lot while you’re talking, chances are you’ve sold them. If you find them leaning backwards in their chair, hands crossed ... or even taking phone calls, chances are they are just going through the motions with you.
Engage them, ask questions, overcome objections and ask for feedback. God gave you two ears and a mouth for a reason, listen twice as much as you are talking when selling a client... If you give them what they want and can agree on a price... then show them how you are going to over deliver on what was discussed. I guarantee your chances of success will increase.
Last, ask for the order. Never be afraid to ask the client for their business more than once. If you don’t ask, you are never going to get!
Say it Ain’t So...
Yep, sometimes you are going to have to walk away from a client. You will have clients that want everything for nothing
It’s never fun to have to know that you walked away from work. It goes back to those inner thoughts, “Am I good enough to be charging this?”
If you are this far, than I would say you are good enough, and you should walk away. Unless of course there are strategic reasons to do something for little money, or business is so bad you have to take it.
Compromising on price is a slippery slope. If you discount too much, people will find out about it and the next client that walks through the door will come expecting a discount instead of seeing the value in what you offer. Why, cause the referral they got was that you were talented and your prices are inexpensive.
What I offer here are guidelines and examples... food for thought if you will... The lessons here are... (1) to know what you are worth, (2) be able to defend it, (3) give value and be smart about what clients you do take.
I wish you all luck in your own photography business. If there is any way I can help, please contact me through my website here.
Good luck in 2012, and I thank you for all your continued support over the past year,
Kevin
Friday 23 December 2011
Social Media ~ Attract, Convert, Measure ~ PART TWO
This is part two of three in a series of postings dealing with Social Media. This posting will focus on how to Convert web traffic to buying clients.
For those of you that missed “Part One” I would suggest you go back and read that BLOG post so you understand what influences traffic to your website. Then come back and finish reading this post.
Buyers are in control now more than ever, especially consumers coming to you from an online source. There is so much information out there on the internet that our customers are approaching us armed with competitive information and even most are amateur photographers themselves, therefore able to take photos that occasionally rival a professionals. So, not only is there more competition out there, the people we are trying to sell are extremely well prepared before they talk to you.
The keys to converting these types of clients is really quite simple in theory, it just takes a leap of faith from traditional ways of thinking. Just remember the acronym, “RISE", its an acronym for “Respond, Intelligence, Share and Enjoy” …
“Rise” above your competition!
Respond – If a potential client contacts you, respond in an efficient and timely manner with more information than they asked for.
You have so many competitors out there that you need to respond as fast as you can with a personalized message. Engage them and maintain a captive audience.
Intelligence – You have to make sure you know just as much about what your competition offers than what you offer. Sounds silly, but it’s true. Information is power and will give you control.
The Chinese General Sun Tsu who wrote the “Art of War” teaches, “It is said that if you know your enemies and know yourself, you will not be imperiled in a hundred battles; if you do not know your enemies but do know yourself, you will win one and lose one; if you do not know your enemies nor yourself, you will be imperiled in every single battle.”
Share – Prior to the internet, information was scarce. Now, those that are visable on the internet have to share their information and become a trusted member of an online community in order to attract potential clients. If you don't share and offer a lot of information, a competitor is just a click away. Its not like the potential client is driving from store front to store front. They are sitting at home and just have to click on the next photographer to find what they want.
When if comes to social media people do not want to be sold, they just want options. In order to penetrate any social online community you need to be perceived as an expert and just have a strong presence. Remember what I said in part one, “you are in or you are out of social media”!
If you are in, be IN, and participate in the community, share your knowledge and allow the potential clients know you are a trusted source… that comfort level you gain will go a long way in converting the tire kickers into dollars in your jeans.
Think of it this way... why are people on facebook? To reconnect and talk to friends? If you are one of their friends and you are always posting about your products and services and always trying to sell something... well the perception they will have about you on Facebook is probably the same way you feel everytime a pesky telemarketer calls your house at dinner time trying to sell you window cleaning services.
Enjoy – Have fun in your online communities… don’t beat people over the head with your products and services. Just enjoy the communication… send out silly surveys, talk about your family, throw out jokes… let people know the real you.
If you are not enjoying yourself you are not going to do it well. Let’s face it, we are photographers, we prefer to be behind the camera. So while doing this necessary evil, you might as well enjoy yourself. Your engaging personality will come through and people will learn to trust you... then they will buy from you.
In the next post in this trilogy I want to start to discuss something that I just learned… it’s called the “Social Media Money Formula” … this again comes courtesy of Tyler Garns. In addition to that you can also expect to learn how to "Measure" your efforts to see if they are working.
But not only "Measure" success, but I will take a deeper dive and help you really understand what your ROI is. We will be accounting for more than just looking at the money you make, but the time you spend doing certain things.
Talk soon and remember to RISE above your competition!
If you would like more information please contact me below. If you also want to be on my mailing list, please email me and I will put you on the distribution list that goes out 4x a year.
Please contact me by clicking here
Enjoy the holiday season with your family and friends.
Kev
Friday 16 December 2011
Social Media ~ Attract, Convert, Measure ~ PART ONE
I attended a webinar this week about social media. The webinar was put on by Tyler Garns. If you are on TWITTER you can follow Tyler at @tylergarns
The information he pumps out is extremely valuable to anyone owning a small business and wanting to grow their revenue through maximizing online.
I am going to split this blog out into three parts because of the vast amount of information I have to give. This posting will focus on what influences website traffic to your website, the “Attract” portion of these BLOG entries.
What influences website visitors?
The primary influencer to a small business’s website still is “familiarity with your brand”. Generally this accounts for 38% of your monthly traffic. This is people that know you or your company name and will search for your name on a search engine query. Or they will come directly to your website by entering in your URL. I suggest that you go to your analytics tool and look at the referral traffic to your site, find out where the traffic is coming from, and add up the searches with your name or company name to the direct traffic to your specific URL.
This will show you how familiar people are with your name or brand, and how that translates to a percentage of your overall traffic
The second most influential for website traffic is promotional emails. In my experience I know this to be true. If you are doing email blasts or newsletters, and you are doing it right with deep linking you will see the benefits. If this is something you are doing in your mix of marketing, the statistics say that this will generate approximately 19% of your website traffic.
Where that traffic from your newsletter lands is entirely up to you. I like to drive people right to specific pages on my website. Why? Because I know what pages I have higher conversation ratios of taking browsers to paying clients.
The following marketing initiatives seem to bunch up and represent the second tier of marketing influencers to your website.
Search Engine Results accounts for 8%
TV, Newspaper, Radio and Magazine account for another 8%
Word of mouth recommendations yet again accounts for 8%
Traditional internet advertising accounts for 7% of your traffic generation.
To be honest I do not know many photographers that advertise on TV, Radio, newspaper or magazine; and frankly there are very few that even do traditional internet advertising.
I would suggest that us, as photographers spread the 15% that these advertising mediums traditionally account for and distribute that over our newsletters, social media, SEO and SEM tactics. What we do, do as photographers is influence our search engine results and if we are paying attention to our reputation, we can influence positive word of mouth.
Search engine results being on average 8% of a small business web traffic is low to me. While I just let it go on the webinar because there were many types of small businesses in attendance, I disagree with this stat for a photographer. If you are trying to grow your business, and you have a website you will be focusing significant amount of your time on keywords and meta tags on your website to ensure higher ranking in search results. I know I do, and I pay as much attention to this as I can, both on my blog and on my website that showcases all my photos. Search engine results, and subsequent click thru to my website accounts for just over 10% of my website traffic… and growing.
I am sure if I purchased keywords this would grow, but I decided to focus on SEO versus SEM, I am saving the money and I only invest my time. And yes, time is money, but when faced between watching TV or doing SEO on my site, doing the SEO usually wins over a mind numbing episode of Grey’s Anatomy… Now, the Big Bang Theory is another story. Not much gets in the way of me and my thirty minutes with Sheldon, Leonard, Penny, Raj and Howard.
The last grouping of influencers seems to fit together nicely as well. It will prompt those of you that do not participate in social media to question whether it’s worth the effort, but for those of us that participate in social media already have the answer, and that answer is yes, absolutely.
The statistics show that for small businesses the following seems to generate smaller percentages of traffic.
Interaction on Social Networks accounts for 5% of the traffic
Blogs and discussion boards account for 3% of the traffic
Shopping comparison sites and product review sites account for 4% of the traffic.
Personally, as a photographer that participates in social marketing, I can say firsthand that social marketing is the largest influencer of traffic to my website. BUT… a word of caution. You are either doing social media or you are not. There is no half way here. Commit yourself to it and you will drive traffic.
Social media is a huge topic unto itself so I am not going to go into all the details here. Social media can consist of using websites such as… Facebook, Google+, Farmville, Flickr, 500px, youtube, Gowalla, Instagram, twitter and many, MANY others.
The trends that do seem to be taking hold that you might want to look at are, “Urbanspoon”, a geo based application that will find places to eat, be entertained etc, Google and Facebook places to list your businesses on to be found. Other trends that are on the rise are Foursquare, Gowalla and Groupon. But one that I would suggest you get involved in is YELP… get engage here and see the rewards for traffic generation, and subsequent conversation because the traffic are qualified prospects.
The next posting will be about converting traffic from browsers and tire kickers to actual clients… that will come out next Friday at 6pm EST.
In the meantime, if you want more information please contact me below.
If you also want to be on my mailing list, please email me and I will put you on the distribution list that goes out 4x a year.
Contact me by clicking here
Until next time, happy shooting!
Kev
Thursday 15 December 2011
An Interview with Kevin Pepper
please click the link below to read an interview i gave about my growth from an amateur photographer to professional
please click here
please click here
Wednesday 14 December 2011
Macro Photography
Macro photography is just another term for close-up photography. There are various schools of thought on when a photo becomes a “macro”. My view is that a photo becomes a macro when the image in the photo is larger than the subject you photographed. If you would define it as different I would love it if you would share it with everyone below in the comments field.

Macro Gear
Flash
While it's easier to shoot macro on a bright sunny day, often you'll find that you still need to use a flash to fill in the light and help stop any minor motion. With a point and shoot camera you have less options. You should experiment with using the different flashes that are available on your camera. I might also recommend defusing your flash. You can do this by taping a piece of white tissue paper over it. This will soften your flash. DSLR users who don't have an off camera flash will need to defuse their flash with tissue paper or a diffuser. If you have an off camera flash you should bounce the beam of light. If you're working outdoors you'll need to have a white reflector to bounce your flash off of.
Tripod
Even when you're trying your best to stay perfectly still, you move the tiniest bit. This movement can make your macro photography look a little blurry. Using a tripod will help you get a sharper image. So you don't have to touch the camera when it's taking the picture try using the timer or if you have a DSLR use a remote shutter release. For me that is preferential.
If you're shooting pictures of insects using a tripod could be quite difficult. Most bugs move way too fast to give you time to set up. In these cases you'll have to take a hand held photo. Brace your elbows against your body and hold yourself as steady as possible. You may even want to lean up against a tree or something to steady yourself even more.
Cameras and Lenses
When working with a DSLR camera, you should consider buying a lens for macro photography. Lenses can be quite expensive, but the right lens will allow you to take great pictures. When purchasing a lens you want to take into consideration what you'll be photographing. A 55mm macro lens will give you beautiful clear images. You'll have to be pretty close to the subject though. If you're planning to take pictures something that will be easily scared, this isn't the best option. Then you should try using a 100mm or a 200mm lens. This will allow you to have some distance between you and your subject. Some people opt for a zoom lens. These are also good options.
If you can't afford to go out and buy a new lens, you can use close-up lenses also called diopters. These are like magnifying glasses you can screw onto the front of your lens. They come in a variety of strengths or magnification powers.
Another option is getting an extension tube. An extension tube is a tube you can put between your camera and your lens to increase the lens' magnification.
Using a combination of extension tubes and close-up lenses will give you the best results for macro photography. Remember to make sure you buy close-up lenses and extension tubes that are compatible with your camera.

On your lens you'll see a series of f-stop numbers. These f-stops determine the aperture setting for your shot. A small f-stop number will make the aperture wider. This means you'll have a shallow depth of field and walk away with a smaller area in focus on your image. .
You also need to adjust your shutter speed--the length of time the shutter stays open. If your shutter is set to stay open for a long time, you'll be unable to get a sharp image of a subject that's in motion. For that you need to set a fast shutter speed.
The most common lens in macro photography is in the 100mm focal range. However, you can get a decent one at 60mm as well. You can even get a super-telephoto close-up lens at about 180mm. What makes them special is their ability to get close to the subject, thus filling the frame with a subject like a bug or a flower bud.
Some will ask if there are zoom lenses that are good for shooting these kinds of shots. The answer most photographers who deal with this type of shooting is that you need to stick with a single focal length, such as 100mm. This will give you a much better quality photo.
The good news is that even though you will need to spend quite a bit for a good quality lens for macro photography, it will be good for capturing great portraits and it will give you fantastic street journalism photos as well.
When choosing your new lens, pay attention to the aperture rating. Try to get an aperture of f/2.8 or greater. Personally, I own a 50mm, F/1.8 which produces fantastic images. This simply means that the opening will be wide enough to accomplish two things. First, you will get excellent blurred backgrounds when shooting at the wide aperture. You tiny subjects will stand out nicely because of this. The second thing is the ability to shoot in low light situations. The wider the aperture, the faster the shutter speed can be.

When you finally make the decision to add this piece of equipment to your camera bag, you will be delighted with the results and wonder why you put it off for so long. Even if you are shooting with the cheapest DSLR camera, the lens is what will make the largest impact on image quality.
Things to Consider
Composition
When following these macro photography tips don't forget the rules of composition. Try to use the rule of thirds in your pictures and remember that they eye is immediately drawn to the light.
One other thought when it comes to composition; compose the shot in the camera. I tend to do my best to fill the frame with the image I want and not rely on editing software to crop down the image later.
Focus
Automatic focus is very convenient, but when working with macro photography you'll usually find that manual focus gives you a better result. It will allow you to have more control over the selective focus on a specific point in your image.
Happy Shooting,
Kev
Sunday 11 December 2011
Being Sponsored – The PROS and CONS - with an update on this entry
Imagine getting free gear from a manufacturer because our photos are so great! Wouldn’t it be fantastic!?
I talked to a few manufacturers at a recent trade show because I was thinking about writing this article. I thought I would ask them each how many times they get contacted by photographers every year, their response, well; it was more laughter than figures. But I did catch them both say it runs into the thousands each year. The advice I received from the people that make the decisions on whether you are even going to be considered a sponsored photographer... “You have to be a top tier photographer and a top tier marketer before we would even consider looking at your portfolio.”
If you are like me you think about being sponsored by a camera company. Well, let me rephrase that, I used to think it would be great. Not anymore. After talking to a few photographers that do get free gear I realized that it is not that special. Sure, you get more expensive gear, the kind us mere mortals dream about using. But the reality is that the sponsoring company holds all the power and the photographer gives up so much more than they really should.
Quite often the company will get the rights to use of the photographer’s images to promote the product you are using. Your work then ends up in promotional pieces everywhere in exchange for a camera and a few lenses. On the flipside, if you actually sold images directly to a company; you would make more than enough to go out and purchase the gear you got for free... and be able to go buy your spouse something nice because they put up with the crazy hours of a professional photographer.
Even worse than not getting the value that your images are worth, there is something that one photographer referred to as “being muzzled”. As a sponsored photographer you will not be allowed to express your honest opinion about the company’s products. Let’s face it, camera companies all make fantastic products, they also all make products that are not that great. Once you are sponsored, you are going to be expected to say that all this company’s products are great. I don’t know what you think... but doesn’t your personal credibility come into question if you are out there saying you don’t believe there have ever been issues with a camera we all know was flawed from the moment it hit the shelves?
Let’s also not forget that a camera manufacturer will want you to use only their lenses... You may not be able to use those Tamron or Sigma lenses that sit in your bag that you have grown to love.
I guess if you want to try for a sponsorship, who am I to suggest otherwise. You will have better gear than me and I will suffer from lens envy if we are shooting side by side. You will no doubt have the gear and definitely the notoriety that I don’t.
But I will have free speech, the best equipment my money can buy. I will not be tied to just one manufacturer and I will still have the opportunity to sell my images to anybody and everybody that will buy them. But then again, you have the better gear and opportunities I dont have...
Which would be better in your opinion?
Regardless if you are sponsored, or not,
Happy Shooting!
UPDATE TO THIS ENTRY - December 9, 2012
I wrote this blog post originally over a year ago and my photography career has really taken off in the past 14 months... I started a new company that has run workshops and runs seminars... and I have recently started to develop solid business relationships with some companies based in the photography business and in the peripherial of the photogrpahy business. So... guess what, I now have sponsors... but the key here is that they are "mutually beneficial business partnerships"
I will say this. I did not accept a "business partnerhsip" with just any company just to get free gear. I created mutually beneficial relationships with companies that have products I believe in... I still will not endorse a product that is not worthy of a positive review. My integrity is too important for the sake of a piece of gear worth a couple hundred dollars... but i do now use products from various companies... and I will review them, I will endorse them and I will, more importantly, use their product to help my students take better photos and help me on my own photogrpahic journey.
The key here for me... "mutually beneficial relationships"... i help them sell gear and get their name out there and in return, for the large numbers of clients that I can get their gear in front of I am paid in one form or another" ... and my partners work with me becasue I am an extension of their company. I believe wholeheartedly in their products and am an advocate for their business philosophies and their product.
Wednesday 7 December 2011
An art form that preceeds Kodachrome
In the infancy of photography, photographers had no choice but to shoot in black and white. Then, in 1936, the invention of kodachrome offered the alternative of colour photography to the world. Surprisingly enough though, black and white photography did not die off, instead it flourished as a popular medium. Modern black and white photography is unmistakably art, and many photographers regard it as the purest form of photography.
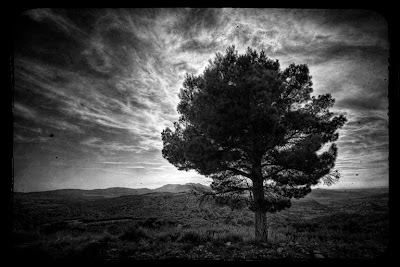
Some will say that nothing but B&W photos can capture the emotion and convey the mood of a photo better. Colors can be stunning, and really add to an image’s beauty, but they can also work as a distraction, especially if you have a lot of bright colours causing confusion.
Black-and-white photography consists of 5 key concepts, below, I have offered 5 tips that you can use to adapt these concepts to your images.
Shapes
When you are shooting black-and-white photographs you should look beyond the colors and focus on the shapes that surround you. Colors tend to take away your focus on shapes, so forget about them when you are out looking for good places to capture.
“Look at the world through monochrome eyes” I was once told.
Easier said than done for a fledgling photographer that was still struggling with the exposure triangle of aperture, shutter speed and ISO… so here is a tip I learned long after I was told to look through my monochrome eyes… go buy a square black and white filter or an grey ND filter. Look at a scene through that filter and train your eyes and brain to see how a black and white image will look completely different than a colour image.
Contrast
OK, here I am talking out of the other side of my mouth now… It is still prudent to not completely forget about colors when shooting black-and-white photographs. There is always contrast between dark and light colors but also between shadows and lighting.
Try shooting a light subject against a dark background. Try to photograph bright colours against dark colours, a soft pale green against a blue background… Do this in order to understand that contrast adds some depth. I might also suggest that you take a look at the color wheel… see what colors contrast each other, and learn how they interact with each other.

Patterns
Patterns can be hard to express in a color image. Colours tend to draw the eye because we are naturally attracted to colours like red and orange. Colours will distract the viewer’s attention and possibly miss the pattern you were trying to bring forth. With black-and-white photography this is not an issue. The pattern will stand out more, so, when shooting black and white… watch for patterns. They are everywhere, and the experienced photographers use them to their advantage.
Texture
In black-and-white photos you should be paying much more attention to texture. The reason is that the color information is not being picked up by the brain. Nothing is there to distract the viewer to really “see” the photo the way it was meant to be seen.
Lighting
This last element is very important because it will affect all of the others that are mentioned above. You can play with lighting in so many different ways. Side lighting can for example create a dramatic effect. Lighting a subject below ads a sinister feeling and creates emotions. Illumination from above can convey peace and tranquility. Dead on flash from the camera that is too intense, well that will just over expose the image and possibly end up in the trash folder.
Now that we have gone through the elements that you need to pay attention to when taking black and white images… use them as a guideline and play with them when you are out shooting. Paying attention to these details will separate your images from the rest.

So now let’s discuss a few points about you and your camera
You as a photographer
There are two types of black and white imagery in my mind. Some may disagree as you get more complex, but for the sake of this article… let’s keep it simple. There are “high contrast” black and white images and there are images that have more midtones and do not reach out to the edges of the whites and blacks on your histogram.
High contrast images convey more reactionary emotion while even flowing grey tone photos are softer and offer more subtlety… Which type of photographer are you? I am not saying you have to be one or the other. I am just saying, pick a style, master it, and move to the other style. Find out where you are comfortable and where your style allows you to go.
Your Camera and Software
If you are intentionally heading out the front door with the conscious thought of taking back and white photos… a few good tips for digital SLR users are
1) Shoot in the RAW format (which you should do for the best quality colour to black and white conversions anyway)
2) You could set the Picture Style, or shooting mode to a black and white mode. The photo will be displayed in black and white on the camera’s LCD screen… BUT, because you shot in RAW, you will still have all the colour information in the RAW file for your conversion afterwards.
3) Maybe grab your ND filters or black and white filters if you do not want to shoot in black and white. This will eliminate the colours when you are out shooting.
4) One last thought… you might have your own software, perhaps Photoshop – or any one of a dozen or so programs. Any of these will do a better job at black and white digital photography than your camera will. Think of it this way – your camera is specially designed to capture photographs. Your software is specially designed to "edit" photographs. Do you really want to ask your camera to do a job that your software is designed to do? Just sayin…
See More Examples of Black and White Images Here
Happy Shooting in monochrome,
Kevin
A Few Of My Favorite Photos
I was sitting here today thinking about what my next BLOG post was going to be and I decided to share some of my favorite photos...
Reflections of an iconic structure
The Eiffel Tower photo is my favorite photo that I have taken in a long time. I love the perspective because it was captured in the puddles. This iconic structure has been shot to death but this one offers something different.
Heavenly Morning
The Fifty Point Conservation area piers behind the military shooting range... I love this photo because it represents patience and perserverence. I went back to this location to try and capture this structure the way I wanted. After 5 trips I believe i got the shot i was after (IMO)
Mount Dumyat, a sheep and Wallis Monument
This photo from Scotland was a trek. I had to climb to the top of Mount Dumyat to get this view. Wallis Monument has been shot from every angle, but few make the trek to the top of the 1600ft vertical elevation through the winding winding path. A hike I am glad i made with Joe, Karen and Dylan
So these are three of my favorite photos, a family memory, a romantic vacation and a trip to my favorite place to shoot.
What are some of your favorite shots?
Kev
Tuesday 29 November 2011
Abandoned Photography - Consider Uncovering the Past
Personally, this has become one of my favorite subjects to photograph. While out shooting abandoned properties i started talking to other enthusiasts. From these conversations I have collected a few useful tips that I believe will help you get the most out of shooting in these environments.
Since the world we live in has been largely mapped and explored, we, as explorers turn our sights toward the old and the ruins of urban and rural life. If this is you, you’ll want to read on.

But Before You Go
See if you can get blue prints for any urban warehouse or factory ahead of time. It will prove extremely useful if you get stuck in a situation you don’t want to be in. You should know where the multiple exits are.
I am not condoning you break the law. But if you are going into a building illegally, scout the location first for the presence of police and security. I would bet you would rather spend that $700 on a new lens rather than a trespassing violation and a criminal record.
If you see security, or think you may be getting busted, carry two memory cards. If you get caught they may make you wipe your memory card (they cannot legally do it, but they could intimidate you to do it in teh situation.) Take one or two shots on a second memory card and then carry it with you. If security comes, do the ole switcheroo with the cards, and if you are made to delete the photos, you won’t lose your shots from the day.
Clothing and Safety Items
A long sleeved thick t-shirt or sweatshirt and a pair of tough jeans, not the flimsy designer clothes either. You will be getting dirty and rubbing up against some rusty surfaces; you want to make sure you are fully protected. A hard hat is also a good idea for places that look like they could be buckling, or where there is an obvious danger of falling objects.

Wear thick shoes or boots. I cannot stress the value of this. I have been in abandoned places many times and you nearly always see broken glass, rusty nails and discarded needles. Anything less than a thick boot is a bad idea.
Get a painters dust mask or better. Some buildings will have asbestos, or at least a LOT of mold. Wearing a dust mask will help protect your lungs. If you see a sign for asbestos, I recommend not going into the building. It’s not worth the risk of cancer.

The single most important tip I can provide anyone planning on visiting an abandoned building is to bring a flashlight and a buddy. Most of these locations are without electricity and will have limited natural light. As such, you’ll need a flashlight to help navigate the dark rooms and corridors that you will encounter. Abandoned buildings are also perfect locations for shelter for the homeless. Visiting these places with a partner will help ensure a safe outing.
A Tripod Is Really Not an Option
Because of the lighting conditions, it goes without saying that you will need a tripod. More than half of the photos I take at these locations are shot on a tripod with a long exposure of anywhere from a couple of seconds to as much as 20 or 30 seconds.

For those instances when I don’t have my camera on a tripod, image stabilization and fast lenses help. My favorite lenses to use are my 14-54mm f/2.8 and my 11-22mm f/2.8 when combined with my cameras stabilized sensor. Wide open, I can usually get a relatively sharp image at 1/10th of a second. More often than not though, the best results will come from shooting on a tripod.
Control the Exposure
I am not one who believes that all serious photographers should shoot in manual 100% of the time. There are plenty of times I am using aperture or shutter priority. Unfortunately in an abandoned building, that tactic will not work. The high contrast between light and dark will play havoc with your images.

Because of the harsh lighting conditions of these spaces, you’ll need to control all aspects of the shot. In the photo shown here, I needed to control the aperture (I wanted this fairly sharp from front to back) and I needed to control the shutter speed to ensure proper lighting due to the sun rays coming from the right. So, in this case I shot for 15 seconds at f/11. This particular image is also another example of a light painting technique. I used a LED flashlight to highlight and bring attention to the end of the hall while leaving the side walls to be lit by the light coming from the windows.
Emphasize the Mood
Use creative angles and perspectives to play up the natural character of the buildings is what will separate your images from the others. Get your camera low to the ground or high up towards a ceiling and shoot to emphasize the vastness of a room, or shoot an angle to heighten the sense of disorientation. As a photographer you are telling the story of the place you are in and even a subtle shift of the camera’s perspective can make a huge impact on the mood of the photo.
Go Wide
A wide angle lens can really add to the sense of emptiness in these buildings. This lens will alter the perspective and allow you to capture more of a room. Real estate agents use wide angle lenses when taking photos of homes they are listing, so apply the same principal here.

Focus on the Details
While it is easy to get caught up in the architecture, try to also pay attention to the discarded items and details in the area as well. Chairs, books, phones, peeling paint or wallpaper and other remnants from days gone by can provide a powerful centerpiece to the image. Focusing on a single object can also act as an anchor in an otherwise busy environment.
Post Processing
Your abandoned photography experience shouldn’t stop in the camera. You should consider taking advantage of the different techniques offered to you by a myriad of software programs. Post processing can give you the possibility of getting different effects out of a single shot.

You can try an HDR technique which will provide you with intense colors and stunning details. HDR ( High Dynamic Range) consists of taking several different exposures of the same scene and then to merge them into one single photo in an editing software, in order to get details in the highlights as well as in the shadow areas. For a software program idea check out www.HDRsoft.com or look at CS5’s HDR capability.

You can also convert the photos to black and white to get more of an eerie and dark mood. Although, you can take the photos directly in black and white in the camera, my advice is to avoid that and to do the conversion in post processing. By converting the photos on your computer , you will have more control over the photo and on how each tone will be rendered in B&W. You will also maintain a color version of the photo in case you didn’t like the B&W effect after all. My personal preference is to do the RAW conversion in the RAW editor of Photoshop. This will offer you richer blacks than any other method I have found.
My final tip is for you to be careful while exploring these buildings. No photograph is worth endangering yourself, so take care whenever you enter an unfamiliar location.
Be safe and happy shooting!
Kev
Monday 28 November 2011
Picasa versus Flickr versus 500px versus SmugMug
I had a few people contact me wanting to discuss photo sharing sites... so I grabbed as much information from the web, from as many places as I could and came up with the following. I hope this helps...
OverviewWhether you enjoy simply sharing photos of your crazy Uncle or you’re a serious photographer that requires a professional level of features and capabilities, you will want to pick a service that best fits your budget and needs. There are many options available out there for you, but when you narrow your search down to what you believe to be the best fit for you; chances are that one or more of these three services will likely be among your considerations.
So, I wanted to take a look at each, including the options, applications and other add-ons services that they have to offer.
Flickr
Flickr is perhaps one of, if not the most popular photo storage and sharing services available right now. It is owned and operated by Yahoo!. The strength of the product comes from its community driven features, ease of use and flexibility to meet the needs of users ranging from beginner to professional. Flickr however, does require you to open a Yahoo! account.
Picasa
Picasa is a popular alternative to Flickr, offered by Google, requiring a Google account. Picasa’s strength lies with its storage and feature integration with other Google apps, affordable and flexible storage pricing, application simplicity and lesser known features. Picasa does have a community aspect but nothing as in-depth as you would use on Flickr.
500px
The quietly growing alternative; 500px sits in the middle of Flickr and SmugMug. Offering a free service that would satisfy any hobbyist yet has a paid service at $40 that offers the functionality that rivals the most sophisticated SmugMug.
The strengths on the product are the social aspect, yet one cannot ignore that the images are far superior to that found on flickr and Picasa. This makes the site the perfect choice for the growing photographer looking to be more inspired.
SmugMug
SmugMug is the lesser known service of these services. This is likely due to the fact that it isn’t an add-on service offered by a multi media giant such as Google and Yahoo!. Don’t let that discredit SmugMug though, as it’s an incredibly powerful service aimed at those a little more serious about their own photography. SmugMug does not focus on community as much as Picasa or Flickr, but instead concentrates their resources to provide very desirable features serious photographers simply won’t find with the other free services.
PricingI’ll go through each service’s pricing options but will only mention a quick overview of the basic features involved in each level. More in-depth features will be reviewed later in the comparison. Or to do the research yourself, I encourage you to visit each website and look into all the features you can acquire for what price.
Flickr is free. Free is hard to beat and this Yahoo! owned service attracts many of its users using that price point. Yahoo!, being such a large company, gives Flickr the resources necessary to reach the free price point with the app design quality to make this service a top choice for those unwilling to pay for photo storage and sharing.
There are drawbacks to free services though, namely advertisements. Flickr does have advertisements if you are on the free service. Of course, this is something we’re all used to and Flickr doesn’t go overboard. The free level account also restricts users to 2 videos and 100 MB of photos per calendar month. You’ll also only have 100 MB of bandwidth available for photos, with “a little leeway for video“. We’ll get into more specific features like photo size limits a little later.
Want to go ad-free? Flickr offers a Pro account, for $24.95 per year. That’s still pretty cheap and gives you unlimited uploads, storage, sets and collections. You’ll get access to your original files, stats on how often people look at your account and the ability to upload HD video.
As with Flickr, Picasa is free. This is no surprise as nearly all of Google’s services are free, a large reason why Google is so incredibly popular today. You might think Picasa’s free price point has held back the app’s design and feature set, but that’s simply not the case. Picasa is uses a simplistic interface by choice and offers many great features, although a little more hidden.
Picasa makes its money by selling storage instead of features or advertising. For free you’ll get all the same features as someone paying a premium, except a lower storage limit of 1 GB. Recently Google reduced Picasa’s storage pricing and increased the number of plans. Remember, purchasing storage for Picasa is shared among your other Google apps because you’re purchasing Google Storage.
At a similar price to Flickr’s Pro, $20 per year gets you 80 GB of storage space. Most users won’t reach that limit and likely won’t even need it for quite some time. Starting at a $5 per year gives you 20 GB of storage space, which can be upgraded (or downgraded) at any time. So upgrade as you need and save money over Flickr!
500px is ad-free and is available in 2 flavours: Free and Awesome. Awesome if $50/year, and offers the following features:
• Unlimited uploads
• Unlimited traffic (bandwidth)
• Unlimited collection in portfolio
• More design layouts for portfolio
• Ability to use custom domain (e.g. username.com)
• Ability to use Google Analytics
• Control over SEO/metadata
• Ability to white-label it (remove any 500px-branding)
• And more.
Free accounts are limited to 20 photos a week, and have fewer options and design themes in portfolio.
In essence, awesome accounts gives an ability to create custom great looking portfolio without worrying about anything else.
SmugMug offers no free plan. This is probably a large reason why it’s much less popular than Flickr or Picasa with novice photographers and weekend warriors. With plans starting at $40.00 per year it’s like purchasing an expensive Flickr Pro account with some advantages and some disadvantages.
You get a free 14 day trial, enabling you to try any plan you would like for the duration of your trial. So, no free plan but you get to try the best SmugMug plan for 14 days to determine if it’s worth your money.
At their base plan, $40.00 per year, you get unlimited storage and traffic with absolutely no ads (or spam). You don’t get video upload capabilities and you have a 24 MB file size per photo, unlike Flickr and Picasa who offers a 20 MB limit (Flickr Pro) and at least basic video upload options.
From a feature POV, this is where Smug Mug accelerates from the pack for more advanced photographers. At $60.00 a year you get DVD quality video uploads, limited to 20 minutes and a 24 MB file size per photo. Right click protection on your images and the ability to customize the look with a custom URL also make this a superior offering against flickr or Picasa.
At the $150.00 PRO level you’ll get all the options of the $60 level, a file size limit (24 MB) and 20 minute HD video uploads, full e-commerce and third party printing capabilities and custom watermarking to further protect your images online.
SmugMug’s real advantages lie with its customization capabilities, giving you greater photo gallery and album theme customization options. Clearly SmugMug isn’t the best choice for those on a budget or looking for something basic to get the job done and store the family vacation photos. But for more serious photographers, IMO, SmugMug should be the choice.
Pricing update on SmugMug... rate increase http://www.petapixel.com/2012/08/31/smugmug-pulls-a-netflix-raises-fees-for-some-customers-by-67/
Interface ComparisonComparing interfaces is difficult and will ultimately come down to your choice of design style and interface features.
Flickr is clearly designed with community in mind and sports a relatively clean and minimalistic overall design. It’s somewhat text heavy (aside from photos) but easy to navigate.
Your account page includes recent photos from your photo stream, contacts, community photos and other general information in the sidebar. It feels a little cluttered a busy to me but going with the Pro account would remove the advertisements and alleviate some of that.
Exploring community photos is definitely one of the best features of these three photo services if that’s what you’re looking for.
Editing and organizing in Flickr very simple and enhanced with JavaScript to create a more seamless experience for users. Creating photo projects to be printed is incredibly easy (and affordable) with tons of great options.
Picasa, however, takes a much different approach with barebones simplicity focused more on your photo albums overview than community or other major features. Picasa feels more directly in touch with your photos and feels better than Flickr for photo storage.
Picasa’s interface is more “folder” oriented, viewing your albums overview, then album photos, then individual photos. With each view, related information is available in the sidebar, most of which can be changed inline. Ordering prints is simple but not nearly as intuitive as Flickr with much fewer options and capabilities. The same applies to photo editing and organizing.
Exploring the Picasa community photos is really quite limited and, although entertaining to a certain degree, it just doesn’t compare to Flickr.
500px has very good social aspects for the photographer to use. Their interface is simple to use and all available options are easy to find. You can easily find photos you post and from your contacts. You have a blog, an area to view all the activity on your images and a wall, reminiscent of facebook.
Customization is easy and the platform is global, making contact with photographers half way around the world is simple and definitely beneficial.
I found SmugMug’s interface to be an entirely different beast than Flickr or Picasa. SmugMug’s account page was quite lacking in overall aesthetics. I was quite concerned that this would apply to the rest of SmugMug’s interface, but I was pleasantly surprised that this was absolutely not the case.
Viewing albums and photos may not be quite as sexy as Flickr but it does have its advantages. For example, instead of viewing a single photo, navigating through the album, you can view a grid of the photos to the left of the main image. Expand the browser window and the page expands to fill the available space, maximizing space utilization, creating a much better navigating and viewing experience.
In SmugMug, you’re able to quickly and easily view the largest size of the photo available that fits within your browser window. Click the image being viewed in an album and a sleek overlay smoothly pops into full browser view, loading the image.
Albums can be individually themed, and there are quite a few to choose from. You can even completely customize themes, even to the point of providing your own custom HTML and CSS. This feature really allows users to customize nearly every detail of their albums, a huge advantage over Flickr and Picasa.
SmugMug is definitely focused on your photos, almost completely leaving out the social aspects aside from comments. You can, of course, easily share photos but exploring community photos is incredibly limited.
While some aspects of SmugMug’s overall interface could be further refined, the important aspects (your albums and photos) is very well designed. Not to mention that Picnik’s online photo editor is integrated for fast and easy photo editing, a feature Picasa lacks (Flickr also includes this). I have to say that I’m impressed with the interface features SmugMug provides, especially in its flexibility to customize it so greatly.
Photo Web UploaderAn important aspect of these services is the quality of web-based photo uploading. While all three services offer desktop tools for this task, I expect a quality web-based uploader that I can reliably access, anytime, anywhere, without issues.
Flickr’s uploader is straight forward, enhanced with JavaScript, showing each item’s progress with an overall progress bar below. The uploader handled small groups of 10+ photos with ease and uploaded photos at a relatively quick speed (not quite utilizing my full bandwidth though).
Picasa’s web-based uploader is… well, it’s not to user friendly to put it nicely. Apparently you’re able to select and upload multiple photos at once using Internet Explorer. In other browsers, however, you’re limited to selecting each photo individually, up to five. For me this is simply unacceptable. Using their desktop software is an easy way to upload and manage your photos, although that’s not really what I want.
500px has a web uploader that allows you to upload multi photos at a time. You simply choose your images, add keywords and descriptive text and the upload is fast. A real positive here is the lightroom plug-in to quickly and efficiently transfer your images right from adobe lightroom.
SmugMug’s web-based uploader is fantastic, featuring drag-and-drop capabilities, incredibly fast uploading speeds (utilizing my full upload bandwidth), individual image progress, time remaining and even actual upload speed. If you do need a plugin or desktop uploader, there are several to choose from.
Features and SpecificationsIf you’ve made it this far, you’re definitely interested in the lesser known capabilities of the three services. These will be the details that will likely be the deciding factor for those more serious photographers. I’ll do my best to include the pertinent information clearly compared.
Max Image File Upload Size
[Flickr] Free: 10 MB, Pro: 20 MB
[Picasa] Free and Paid: 20 MB
[500px] Free and Paid: 30 MB
[SmugMug] Standard and Power: 24 MB, Pro: 24 MB
Max Image Resolution
[Flickr] Not listed, approximately 30 Megapixels
[Picasa] no limit
[500px] 50 Megapixels
[SmugMug] 48 Megapixels
Accepted Image Formats
[Flickr] .jpg, .gif, .png, .tiff (all images converted to .jpg and compressed after upload)
[Picasa] .jpg, .gif, .png, .bmp
[500px] .jpg only
[SmugMug] .jpg, .gif, .png
Max Video Upload Size
[Flickr] Free: 150 MB (Standard Definition, 90 second length), Pro: 500 MB (High Definition, 90 second length)
[Picasa] From Picasa software: 1 GB, from general uploader: 100 MB (Standard Definition)
[500px] Not Supported
[SmugMug] 600 MB (Power users: DVD quality, Pro users: High Definition), 10 minute length
Accepted Video Formats
[Flickr] .avi, .wmv, .mov, mpeg, .3gp
[Picasa] .3gp, .avi, .asf, .mov, .wmv, .mpg, .mp4, .m2t, .mmv, .m2ts
[SmugMug] Unlisted, they claim “99% of the time we can convert from whatever you upload to the h.264 format”.
[500px] Not Supported
Flickr Pros and ConsDue to Flickr being one of the most widely used photo storage and sharing services, there is a large variety of tools, plugins and addons for everything from uploading and downloading to viewing and integrating. Flickr provides their own desktop uploaders and many third-party upload tools are also available via Flickr’s tools page.
If you need custom integration of your photos in your website or somewhere else, Flickr will likely be the easiest way to accomplish that. Although, all these services offer an API.
Flickr converts your images to .jpg and compresses them once uploaded, not something I want done to my photos.
Flickr does provide a pretty decent selection of settings and options, although not at the level of SmugMug.
Picasa Pros and ConsPicasa provides a high quality free desktop application for photo library management that even supports many RAW formats. Picasa offers a standalone uploader for OS X along with plugins for apps like iPhoto. Although images appear to be compressed after being uploaded, it’s only when viewing them. You’re able to download your images in their uncompressed format.
Picasa’s uploaders all seem to have issues at times uploading and downloading large sets of images. On more occasions than I can remember I’ve uploaded 50+ images, sometimes getting upload errors, and then later when I try to download the full albums it misses a few of the images. It’s quite frustrating and even happens in their dedicated software.
Unfortunately, images viewed at Picasa Web Albums look terrible. Most images, especially high resolution images, are blurry and oftentimes dull. If you have a huge number of photos, you should be aware that you’re limited to 1000 albums and 1000 photos per album.
500px Pros and ConsIt’s a personal pet peeve of mine; 500px does not have a right click protection tool. Anyone can right click and save your images right from the site. The only other con I could find is that they are not under the umbrella of a large media company. Flickr has the edge here. It will levy the social networking success of the company.
Your images however will be displayed in excellent quality and facilitated by a slick uploading tool that I enjoyed using. Another huge advantage over other basic services is that you can completely customize your look.
For us in Canada, they are a Canadian company. If SEO and privacy are high on your priority list, unlike USA based services that will have your images reside on their servers in the USA, the images on 500px are not subject to the USA Patriot act. – I suggest you look that up to learn more. Big Brother is watching.
Another advantage to using this Canadian company is as follows. When someone using BING searches for only Canadian search results your photos will be found… unlike the other three services… if a web browser is using BING and searches for Canadian search results, the images of Canadian photographers using Flickr, Picasa and SmugMug will not be seen in the search results.
SmugMug Pros and ConsIt’s more expensive. Simply put, SmugMug is going to be a deal-breaker for many people due to the fact that it’s outright more expensive. With that being said, if you’re really interested in photography and ensuring your library doesn’t suddenly vanish along with your computer one day, it’s hard to beat SmugMug.
While it is more expensive, it’s also the most feature filled of the three services. Smart galleries, theming, enhanced and customizable security and privacy, and even customizable image sharpening are included in each album independently. You’re able to add custom water marks and even sell your own photos (Pro only). You can even setup your own custom domain for your albums.
Your images are displayed at top notch quality, looking simply fantastic. It’s a night and day difference in comparison to Picasa. With the optional and customizable image sharpening, photos that would be otherwise slightly blurry end up looking like they should.
They also offer what they call SmugVault, a backup service, along with their regular SmugMug photo service. These are tied together so you can upload large format images such as RAW, TIFF, PDF and PSD.
In addition to all this; if customer service is important to you, SmugMug delivers the best customer service out of any photo sharing company I have ever used. “Support Hero’s”, an actual person on the other end of a phone are extremely helpful and seem to live by the mantra, under promise and over deliver. The fact that SmugMug has a real person available to answer technical questions is a PRO that trumps and CON in my book.
Final ThoughtsConsidering there are so many features and aspects of these major services, I obviously couldn’t cover everything. They all have their strengths and weaknesses and will appeal to each person differently. With that being said, here’s my short evaluation of each.
Social, easy and with many integration options, Flickr is your Facebook of photo storage and sharing services. It’s super affordable, very well designed and, from what I’ve experienced of the web interface, functions very well. While it will do the job for professionals, there are other options available that would offer more power, control and features.
Barebones and minimalistic, Picasa might be best suited for those looking for something basic or an easy and affordable location for photo library storage. For Google users, it might just be an easy choice, especially for those who’ve already purchased additional Google Storage. Of the three services, Picasa would have to be placed in last place. The strength of Google has made it a contender but it has many weaknesses that will need to be addressed before it will be on par with Flickr or SmugMug.
500px is the web company to watch. It is positioned to grow. Their product suite is excellent, their service feature rich and the image quality is superior to Flickr and Picasa. 500px should be, if not already, for the serious hobbyist that wants to become better. It reminds us that we are a small fish in a sea of talented photographers... it is inspiring to browse through the global pool of images.
SmugMug is a top choice for anyone serious about photography. It’s definitely not a service that outpaces Flickr for beginners or intermediates but it’s clear that SmugMug isn’t focused towards people looking for a free or really cheap solution. Lacking the impressive community integration of Flickr or even the mediocre community integration of Picasa, you’ll really only want to choose SmugMug if you’re more focused on your photos than sharing them with millions of strangers. Photo viewing, customer service and album customization are the areas SmugMug really shines.
Here are my personal thoughts and what I use and have used
I have a flickr account, I also have a Picasa account, albeit just used for my storing photos for my other Google applications like Google+ and Blogger and I also have a SmugMug PRO account that has been fully customized, complete with a custom URL. The only thing I have not deployed is my e-commerce capabilities, but that is in the works as I currently use PayPal and want to transition that properly in the new website environment that I have created.
If you are like me and you are trying to build a photography business, you need a website. Flickr and Picassa are just not going to do that for you. These two online photo sharing destinations are a social medium where you can share photos with communities and discuss techniques with other photographers, get feedback on your images, and they will offer you beneficial residual search engine optimization goodwill for your company name and your company website. The more photos you put up, and add links to your photography website, them more SEO goodwill you create, the higher you will show up in search rankings.
For me Flickr was becoming more about socialization, I was spending more time on there commenting on other photographers images than making images of my own and growing my own photography business. Don’t get me wrong, it has its place to help you become a better photographer, it’s just not where I would suggest you spending a lot of your time. The feedback on your images, while is an ego boost and can direct you in making better images, is not the most technically correct. Don’t think I am being a negative Nelly about flickr and the people on there; I made some great friendships on Flickr, learned a lot about photography and Flickr was significant in getting me to where I am today.
I still have the account but do not really use it anymore. I feel it served as a valuable tool while I was still growing as a photographer and looking for an online presence… but now that I have found my tool of choice, I do not leverage Flickr as much anymore.
SmugMug is now my web destination of choice. It is my website, my blog, my photo collection tool and I still have the opportunity to look at other images and be inspired by what others are posting, plus I get more insightful feedback from the professional photographers in the SmugMug online community.
The money I spent on SmugMug has paid for itself tenfold since I launched my new website, www.kpepphotography.com six months ago. I have sold more images since this website has launched, had more articles published since this website has launched, and at the end of the day, have made more money in the last six months than I have in the last 3 years. I do not regret the decision to switch to SmugMug for a minute.
SmugMug allowed me to integrate my blog, leverage my social media tools like DIGG and twitter, run my website both on the web and through mobile devices, plus have a photo sharing tool all into one easy to use web destination that I use to market my products and services, showcase my images and blog my reviews, tutorials and opinions.
SmugMug even allows me to post client images online, password protect them in specific galleries, and only allow who I want to see them, access them. So, not only am I making more money with SmugMug, I am saving valuable time by allowing clients to view photos on their own time, right from their own home.
But the real winner for me in this exercise is 500px. After originally reviewing SmugMug, Picasa and Flickr I was directed to 500px from a few people. After registering and going through the sites capabilities and features I was thoroughly impressed. 500px offers users an abundance of capabilities, the photoraphers on there are a few notches above what you will find on flickr and picasa and they offer just a bit more of the social aspect than SmugMug.
Let me relate the strength of 500px in terms of benefits if you are trying to generate traffic to your website. I registered, posted 20 photos on my profile on a Wednesday night between 10pm and 11pm. I added some basic HTML coding in my listings with a few deep links to my website and put my website URL and blog URL in my profile. On the Wednesday the traffic from 500px was 5% of my daily traffic, on the Thursday 500px had accounted for over 25% of my daily traffic to my website and blog.
The plethora of options like the Adobe lightroom plug in tool, the built in blog, api's, your own discussion board, very user friendly uploader and the ability to build a custom looking website with your own URL aside... 500px is a very solid online tool that you seriously need to consider.
I just considered it, I joined and it is now a very important part in my social networking platform and web strategy to grow my photography business.
If you have any questions about one service vs. another, please ask in the comment section below. I will do my best to answer any questions as fast as I can.
Saturday 26 November 2011
Friday 25 November 2011
Want to market your photography business better? This is a must read posting…
Are you looking for ideas on how you can market yourself, your photography, and your business? The tips below will give you plenty of ideas on how to grow your business. Remember, just as with photography, you need to find the marketing techniques that fit your style and personality. So read the list I have below and look for other tips from photographers. Once you have done that, pick a few that you feel fit your business model. After you implement some into your photography business, evaluate their effectiveness and adjust as needed to optimize success.
To make it easy, I have divided the marketing tips into categories. “Getting Visual”, “Thank you and gifts”, Get Out there”, “Pricing” and “Motivation and other ideas”. You will notice many of these tips could be in more than one category. It just depends how you choose to look at them.
I hope You find value in some of these suggestions and it helps you succeed in your photography business endeavor.
Get visual
Google Places - When you search on Google and include a location in your keyword, such as “Madison Wedding Photographer,” Google is now putting their Google Places listings BEFORE the organic listings in their rankings. These listings are free, so go and get one now! Go to Google Places and fill out as much as you can on the page. Make sure to upload some photos as well, as they sometimes show up there in the search results. It’s a great way to improve your chances of being found on Google when people are searching for a photographer.
Use Facebook to promote your images - Uploading images to Facebook and tagging your clients in them is a really fantastic way to get the word out about your business as all their “friends” may see the photos tagged of them. I highly suggest creating a “Page” instead of using your profile, as that’s how Facebook prefers you promote your business, and change your settings (in Edit Page -> Apps -> Photos -> Go to App) to allow fans to tag themselves in your photos. I find this is a great way to get exposure from wedding guests and their friends as well.
I also post links to my blog on my page and send out behind-the-scenes announcements to the people who have liked my page from time to time.
Do be aware that Facebook has strict terms of service about not using it to promote contests. You can require people to like your page to enter a contest, but you can’t require them to comment, like, or post anything else to their profile in order to enter or win. Definitely read their terms of service before promoting a contest on Facebook.
There’s lots of different ways to promote your business using Facebook – share a comment below on your favorite way to promote your business on Facebook. I’d love to hear some more ways you are using it.
Blog as often as you can - Having fresh content on your site is one of the best ways to let Google know that your is site active (which gives you better rankings) and shows your customers that you are busy. When I visit a site that hasn’t been updated in a few months, I often wonder if they are still in business. If you don’t have many shoots, spread out your posts (do a few images one at a time instead of all in one big post) or show some personal work.
It’s also extremely valuable to blog about things that your clients want to know. For example, wedding photographers may want to put out a series on their blog with tips for brides for having better wedding photography (such as hiring a professional lighting company or not getting ready in a church kitchen) whereas portrait photographers may post about what to wear to a session. Providing information to your clients helps them to value you and see you as an authority about the subject.
You’ll also want to make sure that your blog is optimized for search engines so that you can attract search engine traffic.
Start building an email list right away - The more I learn about email marketing, the more I realize that I should have started an email list right away from the very beginning. I’m not talking about buying some random list that people are trying to sell you. I’m talking about people who are interested in your work and opt-in to receive emails from you.
The beauty of the email list is that these clients already like your work enough to give you their email address. They want to hear about your business and about the products you are offering. They may even love your work enough that they want to receive an email every time you update your blog with new photos. These people are priceless.
Want to do a day of mini-sessions? Tell your email list and give them the opportunity to sign up a day before you open it to the public. Have a new product you are offering? Tell your list about it and entice them to buy it.
The opportunities that are out there with an email list are so vast that I’m planning on talking about this more in-depth in the coming weeks. Stay tuned.
Network with other professionals - Get involved with other professionals in your local area. It’s amazing how loyal business owners can be towards each other when you really hit if off. Make sure you’re promoting their businesses to your clients, and they’ll be sure to reciprocate.
If you shoot weddings, it’s especially powerful to network with other wedding professionals since you share clients but don’t have to compete for them.
Get featured on photo blogs - There’s a ton of wedding blogs out there that feature photography, and there are portrait blogs such as Inspire Me Baby that feature portrait photographers as well. Get featured if you can, then promote it where your clients can see it. There’s nothing wrong with reminding them how awesome you are. It’s simply good business.
Use images on your business cards
Have a website with best examples of your work, and keep it updated periodically.
Have different business cards for your different specialties. If you do more than one type of photography, have cards for each type, so you hand out cards specific to the interests of the person asking.
Show your best images on your business cards.
Show it to sell it! Have samples of wall portraits to show clients. When they think an 8×10 will do it, “wow” them with a 16×24 standout mount or 20×30 gallery wrap, and show it on the wall so they can see its value as an art piece.
Have samples of any products you wish to sell, whether it is a gallery wrap canvases to albums, to photo jewelry. People need to touch and feel in order to buy.
Create branding that is unique to you. Make it memorable.
Control the process – and even if you’re a studio photographer and offer DVDs of the session, also give them lists of places to get images printed with a high quality that represents you well.
Thank you and gifts
Keep your customers happy!
Reward past clients with discounts and referral incentives. Give them more reasons to remember you when they are talking to friends and family.
Thank you cards – send one to each client after your studio session, workshop or after they purchase an image from you.
If you are a studio photographer, give customers a set of wallets with their order to use as referral cards. Pick your favorite photo from the session; put your studio/contact information on the back. If you run workshops, send them a few photos that they took while on your workshop that you edited for them.
For studio photographers, include bonus, surprise prints with the customer’s order. For people that run workshops, go above and beyond the clients expectations. A handwritten note explaining how much you loved working with them and value their support.
Offer a unique gift before the session, during or after – it could be a small gift certificate, refreshments or fresh baked goods, or any other small token of appreciation.
Get out there {for more word of mouth and visibility}
Deliver an excellent product and experience. Your customers will talk about you.
Show up at local events, and with permission from the organizers, shoot photos. Get your website address out there by handing cards and posting the images online.
Have a contest/drawing for a free photo session or workshop. This way you can collect names, addresses, and emails for all the non-winners for future business.
Use Facebook ads to target local customers.
Start a Facebook fan page to share images, communicate photography specials, and interact with your customers. Invite all your local friends so they can help get the word of mouth underway.
Post customer images on Facebook, and tag them – this is especially effective for senior photography.
Give free artwork and photographs to coffee shops, banks, doctor’s offices, hair salons, baby boutiques, etc. Include a small sign and/or stack of business cards. Stop by occasionally to leave more cards for sharing.
Blogging – blog each session our workshop that you do. Write about how much fun you had and post some images. Those photographed will spread the word so friends and family can see the images on your blog. This will increase traffic to your website.
Use referral cards – hand these out with every order so your past customers can spread the word easily for you.
For children’s portraiture, join a “Mom’s group” and get to know the parents, who may end up your customers and/or refer people to you.
Take your camera everywhere. It is an easy way to start a conversation. And always have your business cards ready!
SEO – if you come up on specific photography searches for your area, potential customers will find you. A good thing to do here is to work with google and find out what the most relevant search terms are for your specific type of photography.
Donate a free session for a fundraiser auction – include a sample of your work and stacks of cards.
Don’t be shy. Hand out cards to people when you are out – for example if a mom is at a park with their kids, give them a card and tell them about you. If you see a photographer out taking photos, pass them a card about your workshops.
Network with a group of local small businesses – and help each other market.
Get your name, website and email listed on all the free photographer databases online and register your business on local directories
Pricing
Volume discounts for large orders
Packages and bundled pricing
Give coupons to your friends to pass out to their friends.
Offer mini shoots or workshops as an introduction loss leader as an introduction to your sevices.
Work for free – not often – but donating time to a charity can go a long way.
Offer occasional deals – for example, “If you book with me in January, get a free 8×10.
Figure out how much money you ultimately want to walk away with from a shoot. If you have, say, three packages available use that amount as your mid-priced package. Then, for your first package (the package you want the customer to see first) price it much higher. The third package will be your lowest priced package, but will be bare bones. This way you sort of subconsciously funnel customers to the package and price in the middle.
Don’t list prices on your web site. If you do, you’ll just be another photographer in the list for them to choose from and they’ll likely go with the best deal. You want the potential customer to call and connect with you. Have them select you because they want “you” to be the one to take their pictures. (I know some will disagree – but it is something to consider) Personally I am a proponent of giving as much information as you can on your website to inform your clients.
Motivation/Other tips and ideas…
Believe in yourself! If you have confidence in yourself and your photography, so will others.
Share with other photographers. Be generous with ideas and tips to help others – and they will give back to you.
Be genuine – give people reasons to trust you to take their photos. People do business with people they like and trust.
ALWAYS over deliver!
Marketing is about being in a marathon, not a sprint. Rather that just one big marketing campaign, provide steady, consistent, and quality photography and service.
Be available! Do not use out of office replies that say you are so busy that it will take 24 hours to get back to them. Make your customers feel important. Communicate in a timely fashion.
Stay positive – never write anything negative about clients, a client’s preference or another photographer on your blog or Google+ or Facebook page. You may just be “venting”, but a new client would be less likely to choose a photographer who has negative posts like that.
KNOW your target market. Determine the ages, sex, marital status, income level etc… and then determine where you can communicate with them.
Good luck with your business,
Kev
Subscribe to:
Posts (Atom)